• Home
  • Organization
  • DIY
  • Recipes
  • Motivation
  • Frugal Living
  • Blog
  • About Us
  • Members Only
  • Social Icons

    • Email
    • Facebook
    • Instagram
    • Pinterest
    • Tumblr
    • Twitter

    Search

Creative Contessa Designs

Saving Time and Money Through Organization

You are here: Home / DIY / DIY Quick and Cute Candy Bouquet

DIY Quick and Cute Candy Bouquet

by Melissa Leave a Comment


Looking for a quick and cute craft that can be used as a get well, thank you, graduation, or birthday gift? How about a DIY quick and cute candy bouquet?

My son’s girlfriend was having ankle surgery, and he wanted to do something sweet to lift her spirits. I am always looking for ways to do meaningful things inexpensively. We brainstormed and came up with the idea to do a candy bouquet. This candy bouquet can be customized in so many ways.

We took a trip to the dollar store and bought a small vase, a Styrofoam insert that would fit in the vase, and some candy. Make sure you get candy that can stick into the foam or purchase lollipop sticks, popsicle sticks, or toothpicks that the candy can be stuck to with glue dots or tape. I had tulle on hand.

Items

  • Container like a vase, pot, etc.
  • Styrofoam insert that fits inside the container
  • Something to cover the Styrofoam if it is visible like tissue paper, ribbon, etc.
  • Candy preferably with sticks (lollipops) that can be easily inserted in the Styrofoam
  • Sticks like lollipop sticks, popsicle sticks, or toothpicks that can be used to attach to candy without sticks
  • Glue dots or tape to adhere candy to sticks
  • A mini mylar balloon on a stick or a homemade sign to say “Happy Birthday,” “Thank You,” or “Get Well Soon.”

Trim the Styrofoam to fit the vase, pot, etc.

Cover the Styrofoam with the tissue paper or ribbon if it is going in a clear container.

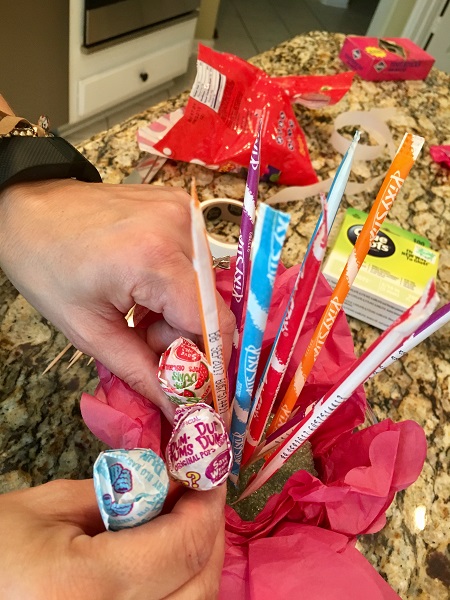
Attach candy to sticks that can be inserted into the Styrofoam. These Pixy Stix were attached to toothpicks.

Arrange the candy. Since this was a round vase, I put the tallest candy in the middle and shortest on the outside. If the container has a definite front and back, put the tallest items in the back and smallest in the front.

Make a bow to add a decorative pop.

Add a get well, thank you, graduation, or happy birthday balloon. Add whatever final touches you want to make this a personal gift!

My son’s girlfriend had a successful surgery, and this little DIY quick cute candy bouquet brightened her day without costing much money! Get creative and share your designs with us!


Share this for now AND later:

  • Click to share on X (Opens in new window) X
  • Click to share on Facebook (Opens in new window) Facebook
  • Click to share on Tumblr (Opens in new window) Tumblr
  • Click to share on Pinterest (Opens in new window) Pinterest
  • More
  • Click to email a link to a friend (Opens in new window) Email
  • Click to print (Opens in new window) Print

Related

Thank you for Visiting!

This post is property of CreativeContessaDesigns.com.
What is the One Question you Would Ask of a Loved One in Heaven?
Kroger Shopping and Weekly Menu

Share your thoughts!Cancel reply

  • Home
  • Organization
  • DIY
  • Recipes
  • Motivation
  • Frugal Living
  • Blog
  • About Us
  • Members Only

Save TIME and MONEY through ORGANIZATION!

Be the first to know what's new with CreativeContessaDesigns.com!

Thanks for signing up for our newsletter and becoming part of our family!

Melissa

Read More…

View My Blog Posts

Nora

Read More…

View My Blog Posts

Check Us Out on Pinterest

5 Cleaning HacksFast and Free Knife Sharpening Hack!I love this easy DIY Magic Eraser Sponge and use it all over my home! Give it a try!Show your school spirit with this no-sew DIY denim tutorial. Customize jeans, shorts, and overalls with ease!Free Christmas Countdown Check ListSharpen Your Knives with What?!Secret Painting Tips from the ProsMake your kitchen in to your own coffee shop with these yummy Homemade Coffee Syrups via A Few ShortcutsTension Rods to the Organizational Rescue!
Follow Me on Pinterest

Instagram

Recent Posts

  • FREE Christmas Countdown Checklist
  • Dry Erase Menu Downloadable
  • Save Money on Groceries FOX 26 News Segment
  • Tension Rods to the Organizational Rescue!
  • Daily Menu: Week 2 Thurs, Fri, Sat & Sun
  • 5 Beauty Cleaning Hacks for Quarantine Cleaning and Beyond

Creative Contessa Designs

Creative Contessa Designs

Recent Comments

  • SavePlus UAE on Save Money on Groceries FOX 26 News Segment
  • Anum Basit on About Us
  • 择偶网 on Dry Erase Menu Downloadable
  • Carol Brandt on DIY Coffee Mug Flower Arrangement
  • Xenne Arnold on DIY Coffee Mug Flower Arrangement

Popular Posts and Pages

DIY Coffee Mug Flower Arrangement
DIY Reusable Chore Charts and To Do Lists
Ball and Glove Treats
Homemade Scrubbing Powder
DIY Quick and Cute Candy Bouquet
Kitchen Towel Organization - 5-Minute Fix
If Life Gives You Coal, Make Diamonds!
Matching Spring Break T-Shirts
DIY Homemade Magic Eraser Recipe

Friends of Creative Contessa Designs

Check out some of our favorite websites!

Coupon Contessa
Simple Boundaries

Creative Contessa Designs

Let us save you time, money, and sanity with DIY hacks, organizational projects, menu planning, and more!

.

Email Nora and Melissa with comments, for sponsorship opportunities, or to claim advertising space on CreativeContessaDesigns.com at CreativeContessaDesigns@yahoo.com.

  • Home
  • Organization
  • DIY
  • Recipes
  • Motivation
  • Frugal Living
  • Blog
  • About Us
  • Members Only

© 2025 · Pretty Creative WordPress Theme by, Pretty Darn Cute Design


Loading Comments...